Increase customer engagement with SMS order notifications. WooCommerce Pinpoint SMS is a configurable plugin that allows you to determine when SMS notifications are sent, how they appear (using simple templates) and offers a simple checkbox opt-in for your customers to request SMS updates for their orders. WC Pinpoint SMS can send you notices when orders are received or canceled. You can even send individual one-time SMS notifications from your admin dashboard.

WooCommerce Pinpoint SMS integrates with Amazon Web Services (AWS) Pinpoint Service to send notifications. AWS provides a reliable, efficient, low-cost solution for delivering SMS notifications.
You will need an Amazon Web Services account to use WooCommerce Pinpoint SMS. The Quick Start Guide will walk you through complete setup to get everything working perfectly!
Order Notifications
You have complete control and can determine which notifications will be sent when different order “events” occur. Additionally, you can customize the content and format of each message using simple templates (much like the WooCommerce email templates).
Customer SMS Notifications can be configured to send when:
- An order is being processed
- An order is on hold
- A customer note has been added to an order
- An order has been fully or partially refunded
- An order has been completed.
SMS Notifications can be configured to send to the store admin when:
- A new order is received
- An order has been canceled
- An order failed
Notification Customization
All SMS Notifications are customizable using templates similar to those used for sending emails in WooCommerce.
Customer opt-out
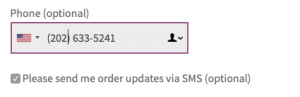
Customers have the ability to opt-out of receiving notifications on their order. To faclitate the opt-in/out, WC Pinpoint SMS will make minor changes to the billing phone number on the checkout page.
WooCommerce Pinpoint SMS integrates with Amazon Web Services (AWS) to provide low cost, efficient and reliable SMS notification services. The guide below will show you how to easily configure your AWS account for use with WooCommerce Pinpoint SMS.
Sign in to Amazon Web Services
- If you already have an AWS account, sign in here.
- If you don’t have an AWS account, you can create one here.
Create An Amazon Web Services (AWS) User & Policy
You are going to create an AWS user that has access to the AWS Pinpoint service. Before you create the user, you will create the AWS Policy that will give the user access to AWS Pinpoint. You can start the process to create a new AWS Policy here.
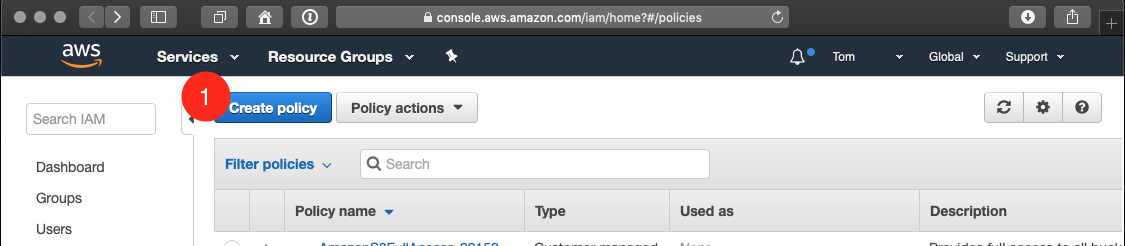
- Click ‘Create policy’
On the next screen, you will define the new policy:
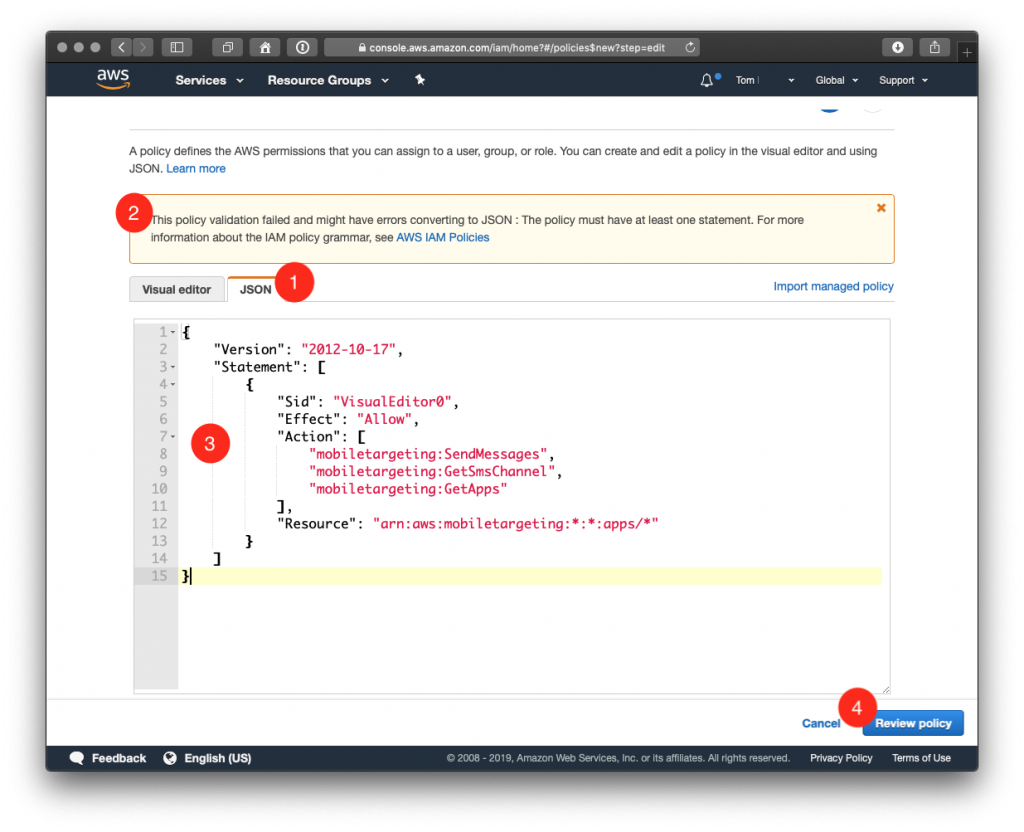
- Click the ‘JSON’ tab in the policy editor
- Ignore the warning message about and remove all of the text from the editor.
- Very carefully, cut and paste the text in the box below into the AWS policy editor.
- Click ‘Review policy’
{
    "Version": "2012-10-17",
    "Statement": [
        {
            "Sid": "VisualEditor0",
            "Effect": "Allow",
            "Action": [
                "mobiletargeting:SendMessages",
                "mobiletargeting:GetSmsChannel",
                "mobiletargeting:GetApps"
            ],
            "Resource": "arn:aws:mobiletargeting:*:*:apps/*"
        }
    ]
}
Name and create the policy:
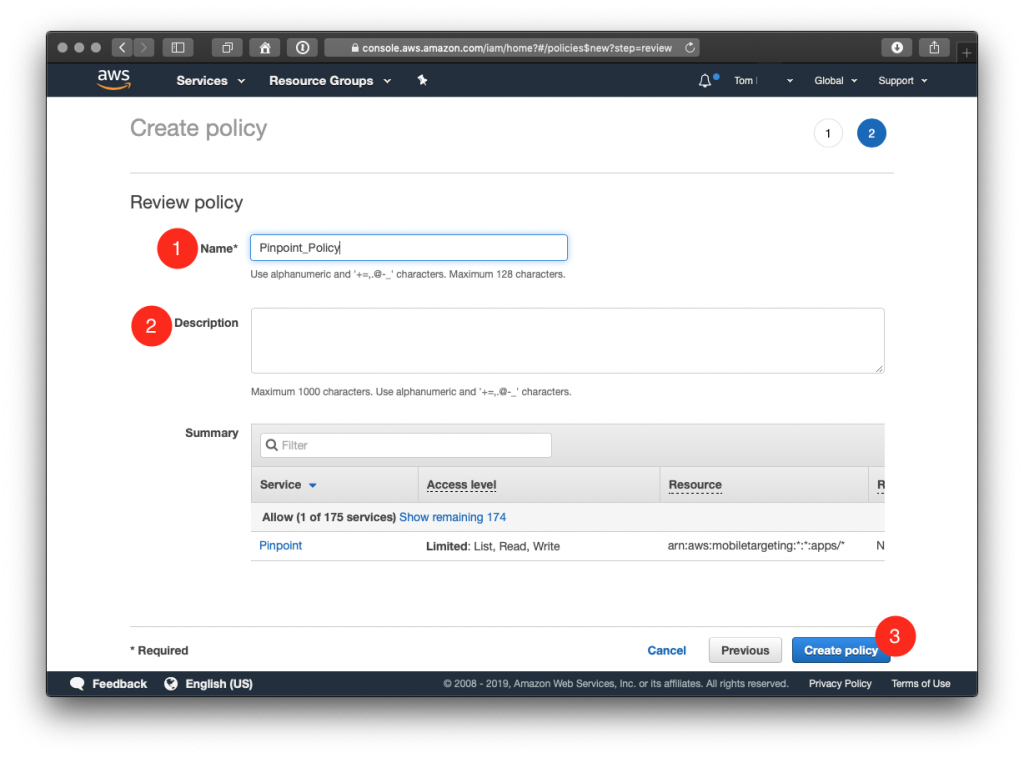
- Give the policy a name ‘Pinpoint_Policy’
- Add a description if you’d like (it’s optional).
- Click ‘Create policy’
Now that we have created the Pinpoint policy, we can create an AWS user and attach this policy to the user. You can start the process to create a new AWS user here.
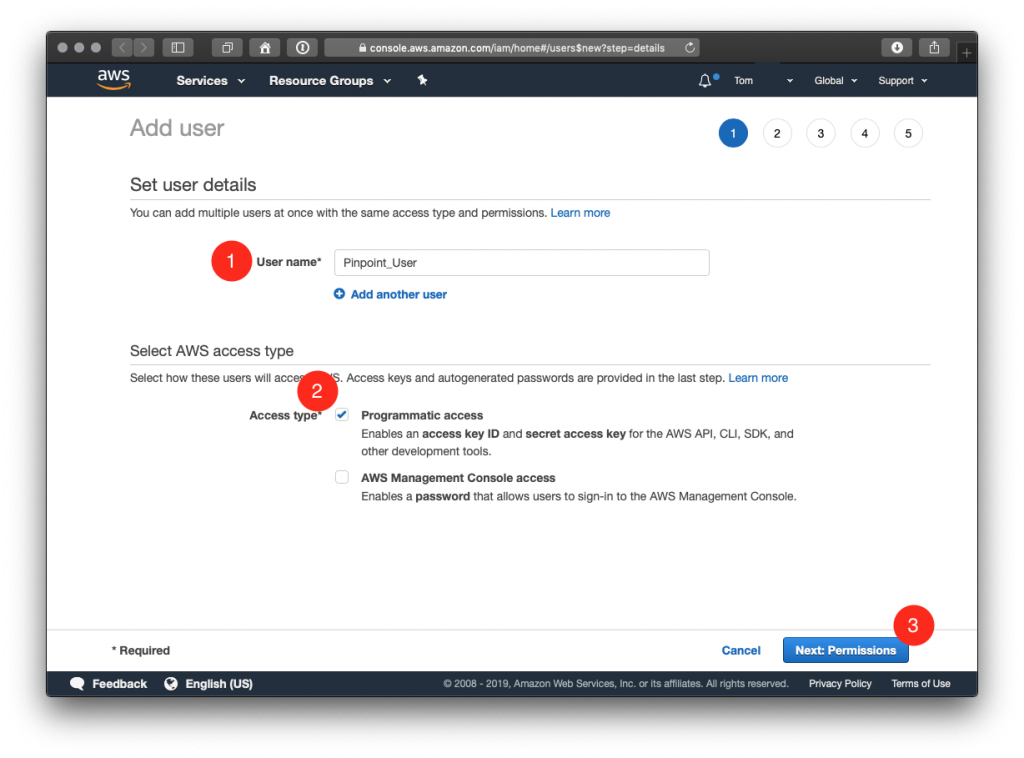
- Enter a name for User name — Pinpoint_User
- Check ‘Programatic access’
- Click ‘Next: Permissions’
Now you will add permissions for this user to access the AWS Pinpoint services using the policy that you just created.
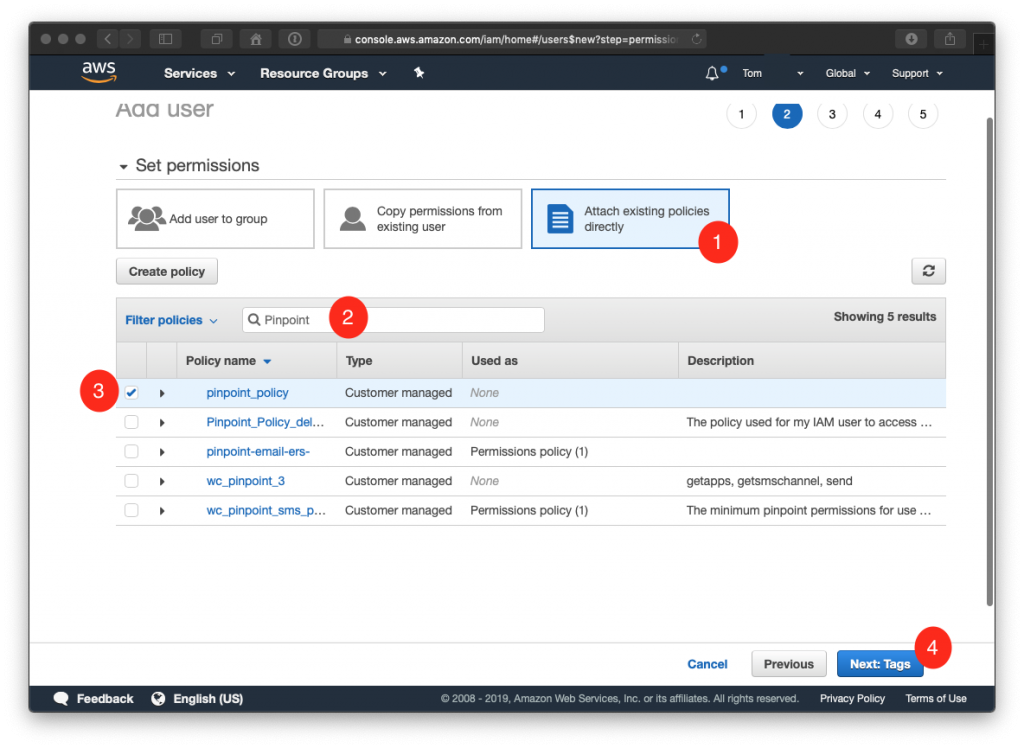
- Click the box that says ‘Attach existing policies directly’
- Put the name of the policy you created in the search box
- Put a check next to the policy you created
- Click ‘Next: tags’
Nothing to do on the next page, so just click through.
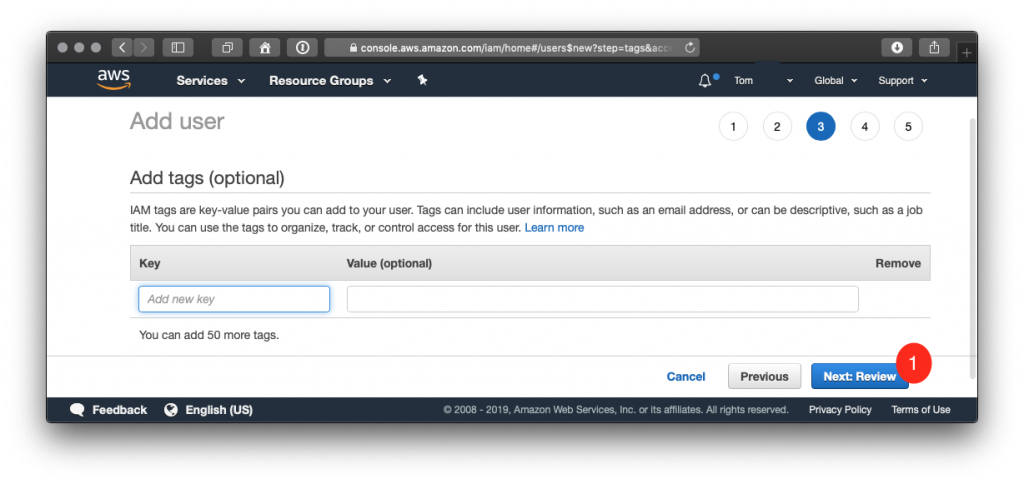
- Click ‘Next: review’
Now you have defined the user and attached your policy, the only thing left to do is create the user.
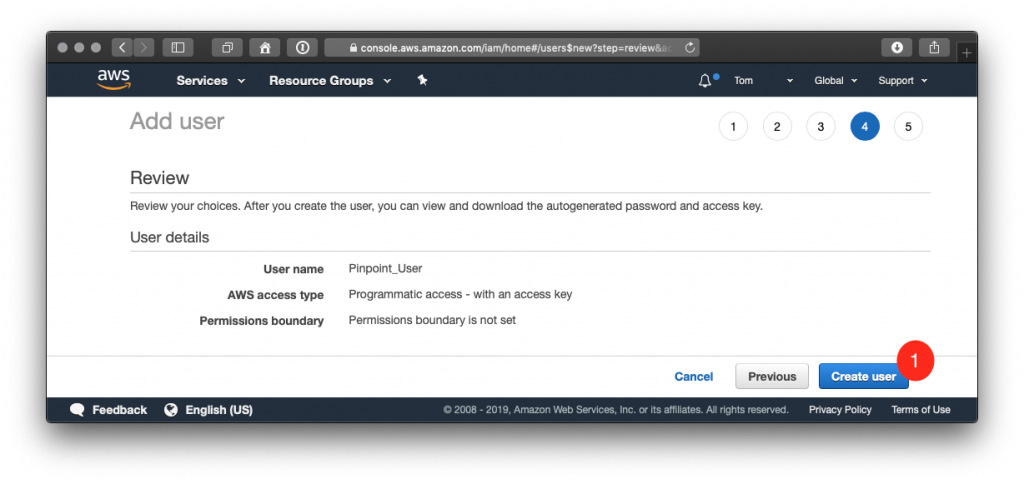
- Click ‘Create user’
You have now successfully created an AWS user that has the needed Pinpoint permissions.
On this screen, you are given the ‘Access key ID’ and ‘Secret access key’. Click the ‘Download .csv’ button to save these keys. AWS won’t show you these keys again, so please keep them somewhere safe — you will need them in the next section. (If you do lose the keys, you can always create another AWS user with the Pinpoint policy you have already created).
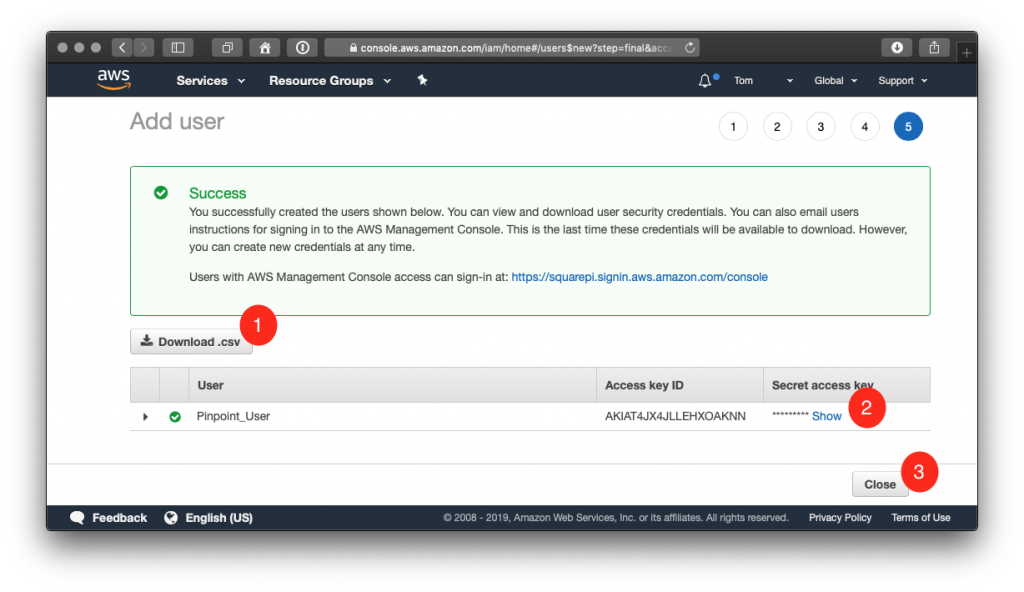
- Click ‘Download .csv’ and keep the file some where safe.
- Alternatively, you can click ‘Show’ under Secret access key and copy and paste the keys into a file of your choosing.
- Click ‘Close’
Add your AWS keys to WooCommerce Pinpoint SMS
Open your wp-config.php file and find the lines that say:
/* That's all, stop editing! Happy publishing. */

/** Absolute path to the WordPress directory. */
if ( ! defined( 'ABSPATH' ) ) {
	define( 'ABSPATH', dirname( __FILE__ ) . '/' );
}
Immediately *above* that code, carefully cut and paste the following code into wp-config.php. Replace the *’s with your AWS Access key ID and Secret access key.
define( 'WC_PINPOINT_SMS_SETTINGS', serialize( array(
	'access-key-id' => '********************',
	'secret-access-key' => '**************************************',
) ) );
Save the wp-config.php file. (If you cannot edit your wp-config.php file or would prefer not to, you can also add your access key and secret key on the WooCommerce Pinpoint SMS AWS Settings page. This method is less secure, but will work equally well.)
A quick word about AWS regions
AWS offers its services around the world. To provide these services efficiently, AWS is divided up into regions. You can see and change which AWS region you are using in the upper right hand corner of the AWS windows. Some AWS resources (like users and policies) are ‘Global’. Other resources (like Pinpoint) are region specific.
This setup guide assumes that you are creating your AWS Pinpoint Project in the ‘N. Virginia’ region. If you cannot use the N. Virginia region or would prefer to use another region, please click ‘Learn More’ to configure WooCommerce Pinpoint SMS with a different AWS region.
Create an AWS Pinpoint Project
To allow WooCommerce SMS to send SMS notifications through AWS, you need to create a Pinpoint Project. You can start the process to create a Pinpoint project by clicking here.
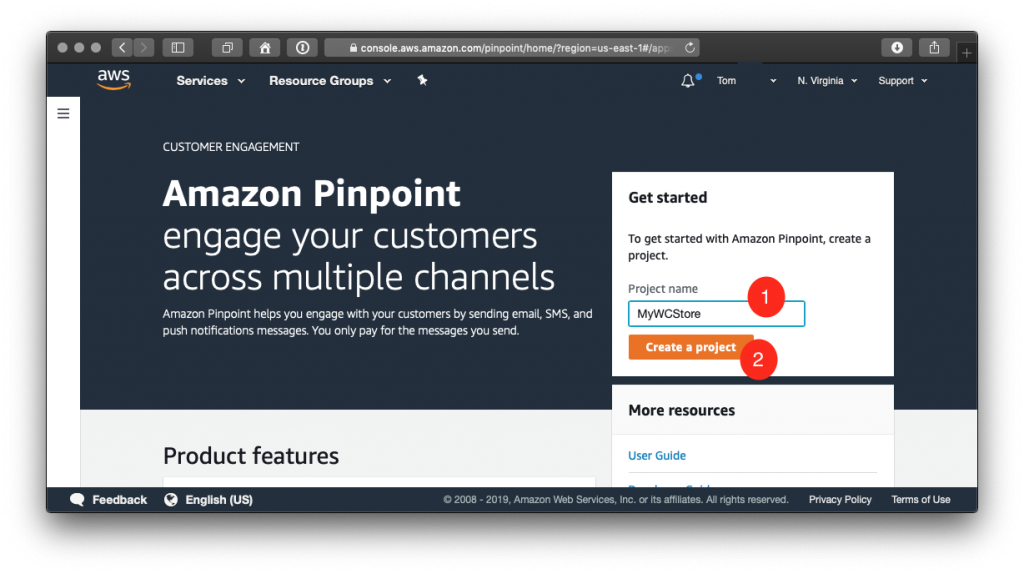
- Enter a project name
- Click ‘Create a project’
Now configure your project for SMS
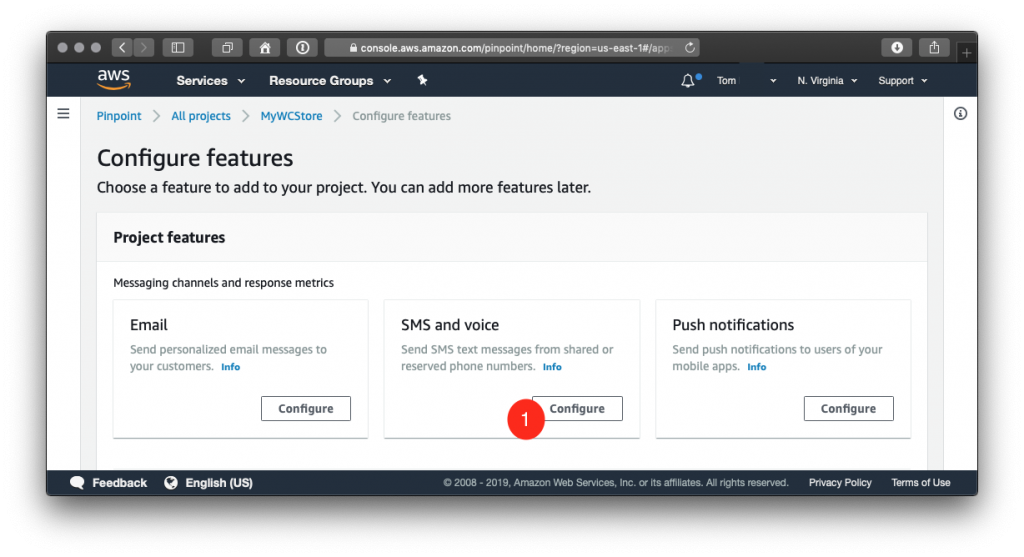
- Click the ‘Configure’ button in the box labeled ‘SMS and voice’
Configure your project for Transactional SMS notifications.
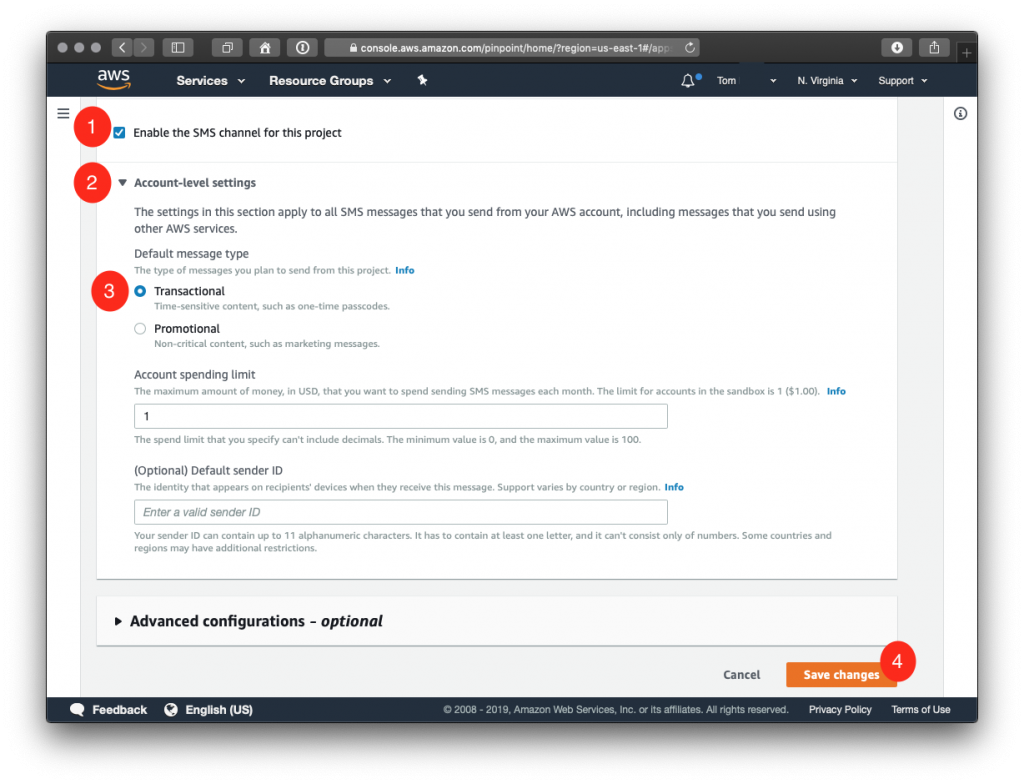
- Check the box next to ‘Enable the SMS channel for this project’
- Click ‘Account level settings’
- Click the ‘Transactional’ radio button (it might already be selected)
- Leave the other boxes unchanged (we will come back to ‘Account spending limit’ later) and click ‘Save changes’
Increase your monthly Pinpoint spending allowance
As a safe-guard, AWS limits your monthly spend on new Pinpoint projects to $1. At current (April 2019) US pricing, this is enough for approximately 150 SMS notifications per month. It is recommended that you increase this monthly cap. To do so, you will make a simple request to AWS. You can start the request process here. (You may have to log into your AWS account again)
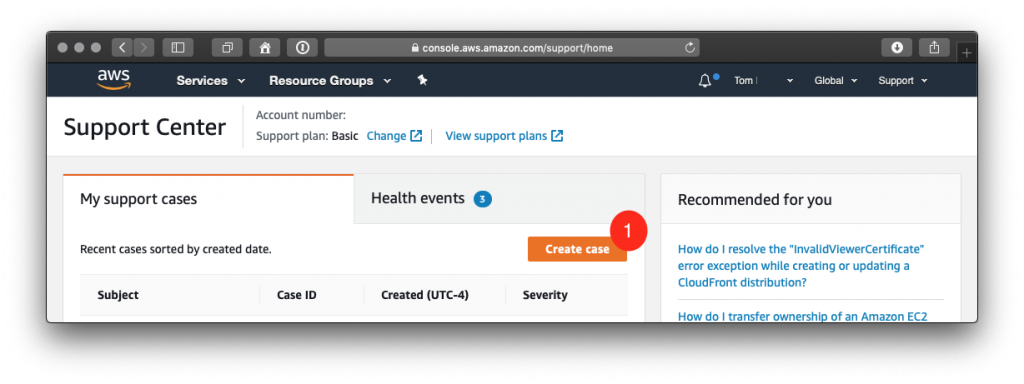
- Click ‘Create case’
Now you will add the details to your request.
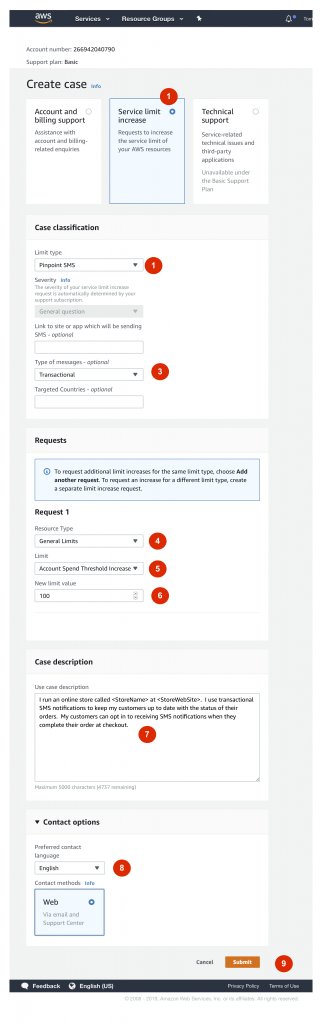
- Choose ‘Service Limit Increase’
- Under ‘Case Classification’ choose ‘Pinpoint SMS’
- Optionally, enter a link to your store, ‘Transactional’ for ‘Type of messages’ and the countries most of your SMS messages will be sent to. You can leave any of these optional fields empty.
- In the ‘Requests’ box, for ‘Resource Type’ choose ‘General Limits’
- For ‘Limit’, choose ‘Account Spend Threshold Increase’
- For ‘New limit value’ box, type the maximum amount in USD that you’ll spend on SMS messages each calendar month.
- In the ‘Case description’ box, write a few short sentences about your store. See the info box below for some guidance and suggestions.
- For ‘Contact options’ , select your preferred contact language
- Click ‘Submit’
.
An Example Case Description
For a successful increase request, your Case Description should include:
1. The name and website of your store that will be sending SMS notifications.
2. The service and/or goods that are provided by your store and how SMS notifications will contribute to the customer experience.
3. How your customers can voluntarily sign up to receive your SMS notifications.
See the example Case Description below for a starting point.
I run an online store called <StoreName> at <StoreWebSite>. I use transactional SMS notifications to keep my customers up to date with the status of their orders. My customers can opt in to receiving SMS notifications when they complete their order at checkout.
It usually takes AWS 2-3 days to respond to your limit increase request. You will receive an email when they have approved your request. When you have received your limit increase approval, follow the instructions in the next section.
Change your AWS Pinpoint App Spending Limit
Follow these instructions when you have received a notification from AWS that your Pinpoint spending limit has been increased. Navigate to the AWS Pinpoint service service by clicking here.
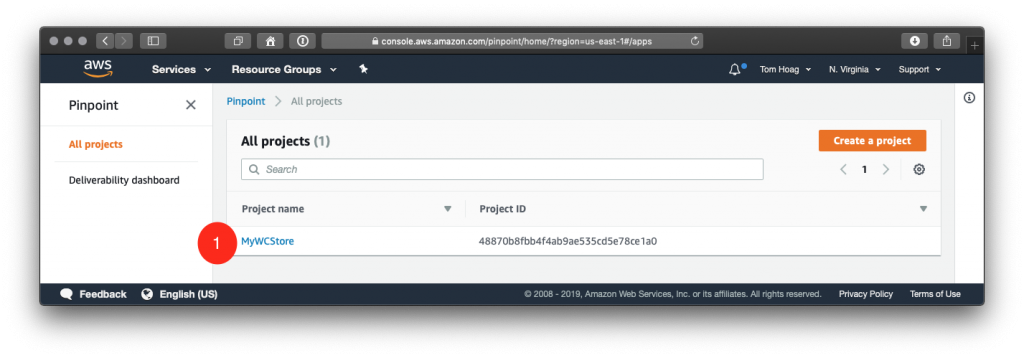
- Select your Pinpoint project.
Now you will change the spending allowance for your project.
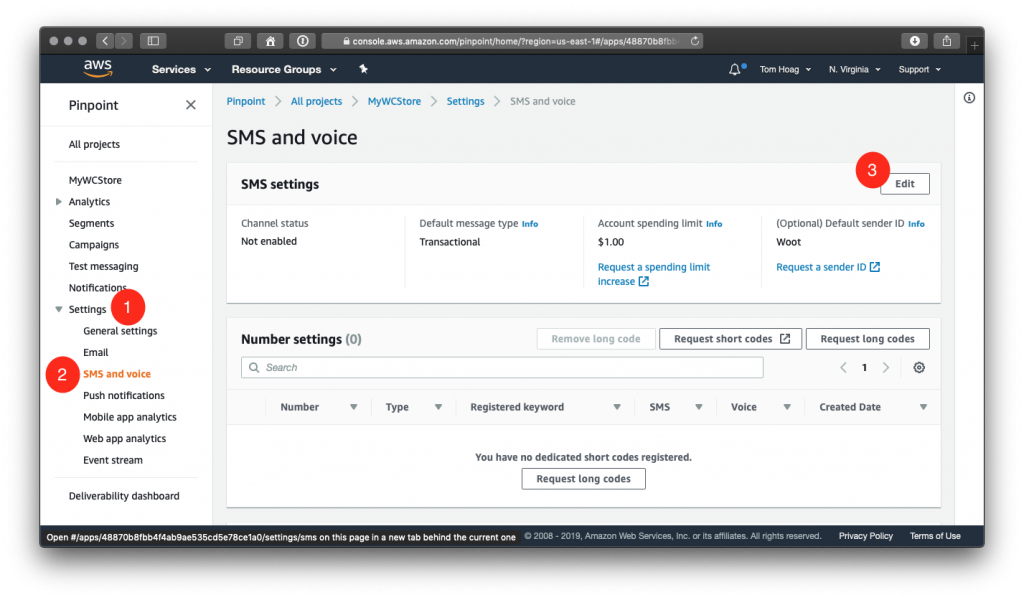
- In the left hand column, select ‘Settings’
- and then ‘SMS and voice’
- Click the ‘Edit’ button
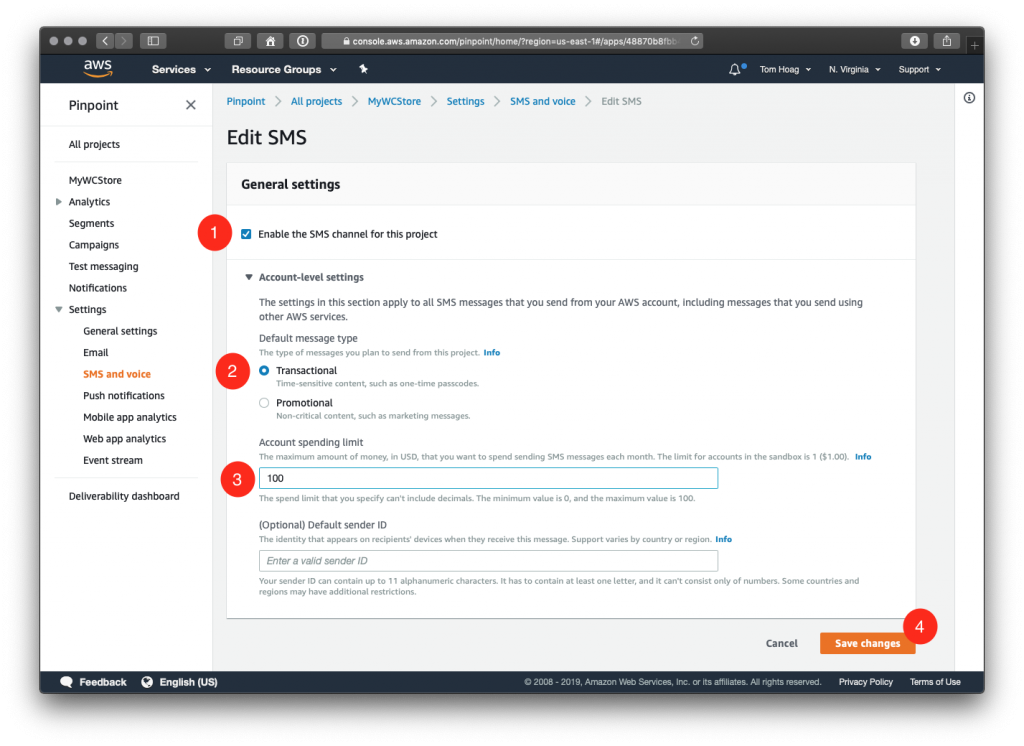
- Be sure that ‘Enable the SMS channel for this project’ is checked
- Click ‘Account-level settings’
- For Account spending limit, enter the maximum amount of money, in USD, that you want to spend sending SMS messages each month. This can be a smaller amount that what you have been approved for.
- Click ‘Save changes’
AWS Region Setup
AWS offers its services around the world. To provide these services efficiently, AWS is divided up into regions. You can see and change which AWS region you are using in the upper right hand corner of the AWS console. Some AWS resources (like users and policies) are ‘Global’. Other resources (like Pinpoint) are region specific.
This setup guide assumes that you are creating your AWS Pinpoint Project in the ‘N. Virginia’ region. If you cannot use the N. Virginia region or would prefer to use another region, please use the instructions below to configure WooCommerce Pinpoint SMS to use a different region.
WooCommerce Pinpoint SMS by default uses the N. Virginia region. If your AWS Pinpoint Project is in the N. Virginia region, you do not need to add this configuration.
- Sign in to your AWS account
- Navigate to AWS Pinpoint by clicking here
- Locate your AWS Pinpoint project. This may require that you change the AWS region using the dropdown in the upper right hand corner.
- Find your ‘Region Name’ on the ‘Amazon API Gateway’ table on this page and note the corresponding name in the ‘Region’ column.
- Open your wp-config.php file and add the following code immediately below where you added your AWS keys replacing MY_REGION with your region (inside the single quotes!)
define( 'WC_PINPOINT_SMS_REGION', 'MY_REGION' );
7. Save and close the file.